
Last month my cousin asked me for a small favour. He wanted his dance video to look like he was dancing on a beach, not in his messy bedroom. It took me almost 2 hours.
His hair was flickering, one hand kept disappearing, and my phone became so hot that I could not hold it.
After many mistakes, I finally learned how to remove the background from a video on Android the right way, using only free apps from the Play Store.
Two Ways to Remove Background from Video on Android
Choose the right method first. This saves a lot of time.
1. AI auto-removal. The app finds the person in the video and cuts out the background by itself. It is fast and easy. CapCut does this well.
2. Chroma key (green screen). You pick one colour, mostly green, and the app makes it invisible. The result is cleaner, but you need to shoot the video in front of a green cloth or wall.
If your video is already recorded, use AI removal. If you are going to record a new one, use a green screen.
Method 1: Remove Video Background on Android with CapCut
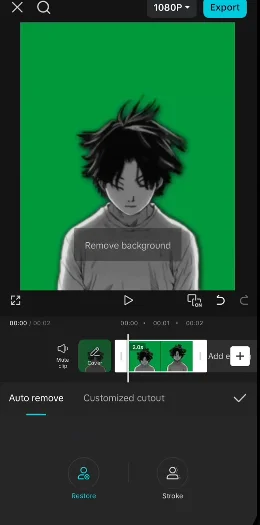
CapCut gave me the best results on my mid-range phone. Menu names change after updates, so if you see a slightly different name, pick the closest one.
Step 1. Open CapCut, tap New Project, select your video and tap Add.
Step 2. Tap your clip on the timeline.
Step 3. Scroll the bottom menu and tap Cutout (sometimes it is called Remove BG).
Step 4. Tap Auto remove and wait a few seconds.
Step 5. Pause the video at different places and zoom in. Check the hair, hands and anything the person is holding.
Step 6. If something is missing, try Customised cutout.
Adding a New Background
This confused me in the beginning because layer order matters.
- Put your new background (photo or video) on the main timeline.
- Tap Overlay, then Add Overlay, and select your video.
- Apply the background removal to the overlay clip, not the main clip.
- Pinch to resize and drag to set the position.
I did it the opposite way once, and nothing changed. If your person is not showing, check the layers first.
Method 2: Chroma Key for Green Screen Videos
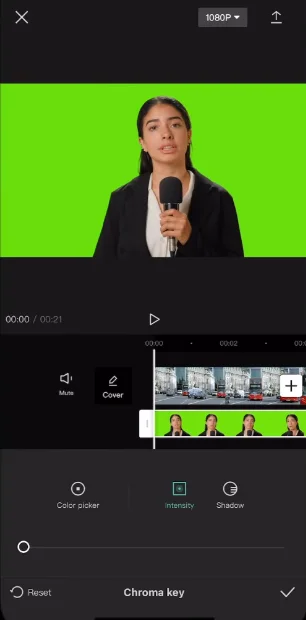
I taped a green bedsheet on the wall and recorded again. It looked funny, but it worked.
Step 1. Put your background on the main track and the green screen video as an overlay.
Step 2. Select the overlay and tap Chroma Key.
Step 3. Use the colour picker and tap on the green part.
Step 4. Increase Intensity slowly until the green goes away. Then use Shadow to clean the edges.
Do not push the sliders to the maximum. When I did, my cousin’s face also started to disappear. Small changes work best.
VN Video Editor and Filmora also have chroma key. Look in the clip menu.
Mistakes I Made While Removing Video Background
Dark clothes on a dark wall. He wore a black hoodie in front of a dim wall. The app could not see where he ended and the wall began. Contrast matters a lot.
Low light. Dark videos have noisy edges, and noisy edges flicker. One simple lamp helped me more than any setting.
Fast movement. When he waved his hands quickly, the cutout broke. Slow movement gave a smoother result.
Messy background. A patterned curtain behind him left small pieces on his shoulders. A plain wall is much better.
Not checking the preview. I exported the full video and then saw a glitch at second 8. Always watch the full timeline before exporting.
High export quality on a weak phone. The app crashed two times at the highest quality. 1080p is enough, and 720p is fine for social media.
If Your Phone Is Slow
I tested this on a budget phone too. These things helped:
- Close all other apps before editing.
- Trim the clip first. Work on 10 seconds, not 2 minutes.
- Lower the preview quality if the app has the option.
- Clear the app cache if it starts lagging.
- Give your phone a short break. Heat makes everything slower.
Free vs Paid
The basic cutout and chroma key in CapCut worked for me without paying. Some extra effects need the Pro version, and this can change with updates, so check before you start a long edit.
Also, use only official Play Store apps.
FAQs
1. Can I remove video background on Android without an app?
In most cases, no. You need an editing app like CapCut, VN or Filmora.
2. Which is the best free app for this?
CapCut is the easiest for beginners. For green screen, VN and Filmora are also good. Results can vary by phone and app version.
3. Do I need a green screen?
No. AI removal works on normal videos. A green screen just gives cleaner edges.
Final Thoughts
Removing a background from video on Android is not magic, but it is not very hard either. My first try was a disaster. I wasted 2 hours, my phone got hot, and the video still looked bad.
But that mistake taught me something important: good footage matters more than fancy apps.
Most people blame the app when the result looks bad. In my experience, the problem is usually the video itself.
Low light, fast hand movement, and clothes that match the wall cause most of the flickering. When I fixed these things, even a basic free app gave me a clean result.
Here is the simple routine I follow now:
- Record in good light, near a window or with one lamp.
- Use a plain wall behind the person.
- Wear clothes that are different in colour from the background.
- Move slowly, especially the hands.
- Test a 5-second sample before editing the full video.
- Watch the full timeline before you export.
Start with CapCut auto removal. If the edges still look rough, shoot again with a green cloth and use chroma key.
Don’t rush, and don’t expect a perfect result on the first try. Every video teaches you something new.
If you have a stubborn video that is not working, try the tips above one by one. Change the light first, then the background, then the app.
Usually one small change fixes the problem. Take your time, and your video will look much better.
